To install an awning on your electric camper, start by selecting weather-resistant fabric like acrylic or polyester, then securely mount the brackets to your camper’s roof or wall. Carefully follow the electrical instructions to connect the motor to a dedicated circuit, ensuring all wiring is tight and insulated. Test the awning’s operation, secure all connections, and perform regular maintenance to keep it in top condition. Keep exploring for detailed steps to make your setup smooth and safe.
Key Takeaways
- Choose durable, weather-resistant fabric like acrylic or polyester for long-lasting shade and shelter.
- Verify your camper’s electrical capacity and use dedicated circuits for the awning motor connection.
- Attach mounting brackets securely to the camper’s roof or wall, ensuring proper alignment before electrical wiring.
- Turn off power before wiring the motor, and connect switches or remote controls for easy operation.
- Test the awning’s extension and retraction, then secure wiring and fasteners, performing regular maintenance for safety and durability.
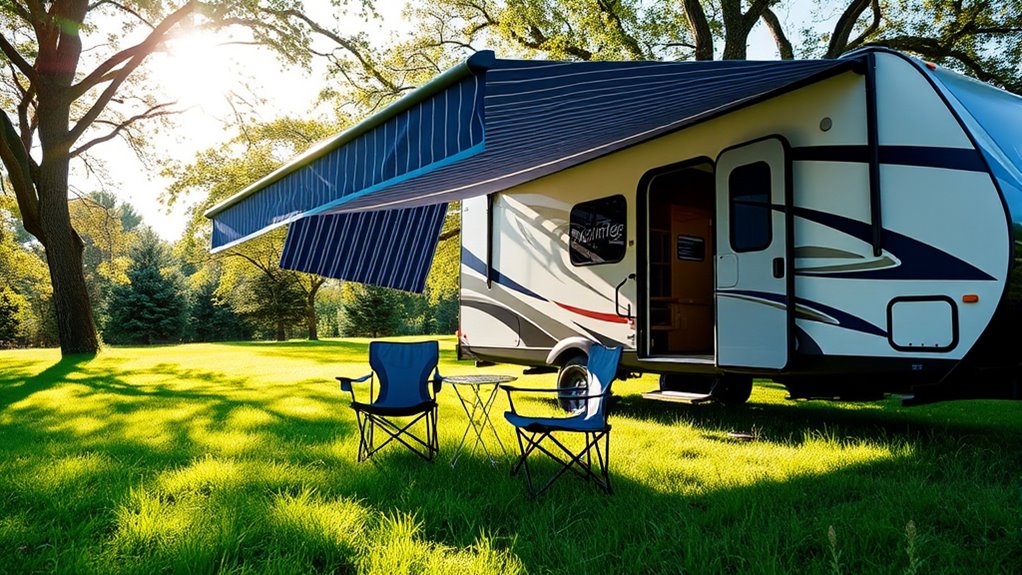
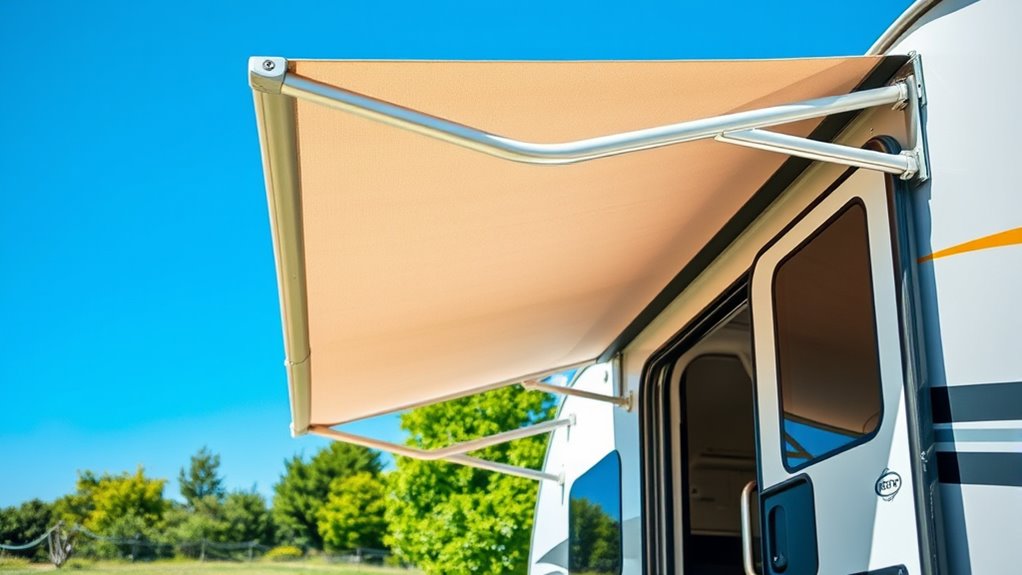
Installing an awning on your electric camper can considerably enhance your outdoor experience by providing shade and shelter. When you’re setting up, the first step is choosing the right awning fabric. You want something durable, weather-resistant, and easy to clean. Materials like acrylic or polyester blends are popular because they resist fading and mold, ensuring your awning stays looking good for years. Once you select the fabric, you’ll need to consider how it integrates with your camper’s electrical system. An electric awning relies on proper electrical wiring to operate smoothly, so understanding the wiring layout and safety procedures is vital.
Before starting the installation, make sure your camper’s electrical system can handle the awning’s power draw. Check your camper’s fuse box and wiring capacity to avoid overloads. You’ll need a dedicated circuit or power source that’s protected by a fuse or breaker. When wiring the awning, follow the manufacturer’s instructions closely. Typically, it involves connecting the motor to the electrical wiring inside your camper, often through a switch or remote control. Make sure the wiring is insulated properly and secured to prevent damage during travel or wind.
Ensure your camper’s electrical system can handle the awning’s power to prevent overloads and ensure safe operation.
During installation, you’ll also need to attach the awning arms and fabric to the camper. This involves mounting brackets on the side of your camper’s roof or wall, depending on the model. Use a drill and appropriate fasteners to secure the brackets firmly into place. Once mounted, you can extend the awning manually to check for proper alignment and tension. When ready for electrical connection, turn off your camper’s power source for safety. Connect the motor wiring to the power supply, ensuring all connections are tight and insulated. If your awning comes with a remote control or switch, position it conveniently within reach for easy operation.
After wiring, test the awning by activating the motor to extend and retract it. Watch for smooth operation and listen for any unusual noises that might indicate wiring issues or mechanical problems. If everything runs smoothly, secure any loose wiring with zip ties, away from moving parts or sharp edges. Double-check all fasteners and connections before heading out. Remember, proper electrical wiring not only ensures your awning functions reliably but also keeps you safe from electrical hazards. Regularly inspect the wiring and fabric for signs of wear, and perform maintenance as needed to keep your outdoor shelter dependable. With the right awning fabric and careful electrical setup, you’ll enjoy reliable shade and shelter on all your outdoor adventures.

VEVOR Motorized RV Awning Complete Kit, 18' Retractable Awning with Aluminum Alloy Frame, Outdoor Trailer Awning, Fit for Most RVs(Black Fade)
Electric RV Awning Size: We offer an ideal retractable awning for your RV. This 18 x 8 ft…
As an affiliate, we earn on qualifying purchases.
As an affiliate, we earn on qualifying purchases.
Frequently Asked Questions
Can I Install an Awning on Any Electric Camper Model?
You can install an awning on many electric camper models, but not all. Check compatibility considerations like your camper’s mounting points and available space. Different awning types, such as retractable or manual, may suit your camper better depending on its design. Always review your camper’s specifications and consult the manufacturer or a professional to guarantee the awning you choose fits securely and functions properly.
What Are the Best Materials for Camper Awnings?
You’ll want a fabric that balances durability and lightweight ease, making your outdoor haven both resilient and manageable. Polyester and acrylic fabrics often shine here, offering excellent durability against weather while keeping material weight low. These materials resist fading, mold, and tears, ensuring your camper awning stays vibrant and functional through many adventures. By choosing the right fabric, you create a welcoming shade that’s both sturdy and easy to handle, enhancing your camping experience.
How Do I Maintain and Clean My Camper Awning?
To maintain your camper awning and guarantee its durability, regularly clean it using gentle cleaning techniques like rinsing with water and a mild soap. Avoid harsh chemicals that can damage the fabric. Always dry it thoroughly before rolling up to prevent mold and mildew. Inspect for tears or wear, and repair promptly. Proper cleaning and maintenance keep your awning looking good and extend its lifespan, providing reliable shade and shelter during your adventures.
Are There Solar-Powered Options for Camper Awnings?
Yes, you can find solar-powered camper awnings that utilize solar fabrics for energy generation and battery integration for storing power. These options allow you to harness sunlight for charging devices, powering LED lights, or even running small appliances. With these innovations, you stay eco-friendly, self-sufficient, and connected, all while enjoying the shade and shelter your awning provides. Embrace solar technology to enhance your camping adventures effortlessly.
How Long Does Installation Typically Take?
Installation usually takes about 1 to 2 hours, depending on your experience. You’ll need basic installation tools like a drill, screwdriver, and wrench. Start by attaching the awning fabric to the mounting brackets, then secure it to your camper’s side. Make sure to follow the instructions carefully for a secure fit. Taking your time guarantees safety and proper setup, so don’t rush through the process.

RVSNAIL RV Awning Fabric Replacement 13'2" – Camper Awning Replacement, 19.5oz Heavy Duty Vinyl Camper Awning, UV & Weather Resistant, Universal Awning for RVs, Motorhomes, Campers (Black Fade, 14FT)
All-Season Weather Defense: RVSNAIL rv awning fabric is designed to handle any weather condition with UPF 50+ UV…
As an affiliate, we earn on qualifying purchases.
As an affiliate, we earn on qualifying purchases.
Conclusion
By installing an awning on your electric camper, you’re not just adding shade—you’re creating your own personal oasis wherever you go. It’s like turning any campsite into a luxurious retreat, transforming mundane parking spots into your own slice of paradise. With this simple upgrade, you’ll never settle for less than a five-star experience, no matter how remote or rugged the location. Embrace the power of shade and shelter—your adventures will never be the same again!

RV Awning Bracket Compatible with Dometic Sun Chaser Lower Awning Arm Mount
Product Features:Restore the functionality of your awning by replacing your worn or broken awning arm mounting bracket.Works with…
As an affiliate, we earn on qualifying purchases.
As an affiliate, we earn on qualifying purchases.

Kohree Motorized RV Awning Complete Kit,Retractable Electric Camper Awning for RV,Trailers,5th Wheel,Motohome RV Trailer Awning for Camper or Home(14Ft,White Frame)
14FT MOTORIZED RETRACTABLE AWNING: Kohree 20ft motorized RV awning specially designed for RV, camping, and patio use,also easily…
As an affiliate, we earn on qualifying purchases.
As an affiliate, we earn on qualifying purchases.