To safely replace high-voltage cables, start by disconnecting and locking out power supplies, then perform insulation testing on both the old and new cables to guarantee they’re defect-free. Carefully disconnect the old cables, noting their routing, and install the new cables following manufacturer instructions. Use insulated tools, secure all connections properly, and conduct insulation tests after installation. Maintain safety protocols throughout, and if you keep exploring, you’ll find detailed steps to ensure a safe, effective replacement process.
Key Takeaways
- Disconnect power, lockout/tagout, and establish safety perimeters before handling cables.
- Perform insulation resistance tests on new cables prior to installation and after connecting.
- Carefully disconnect old cables, noting routing, and verify new cables are undamaged during transit.
- Follow manufacturer specifications for secure terminations, using insulated tools and proper connectors.
- After installation, conduct insulation testing, verify absence of faults, and energize cautiously while monitoring.

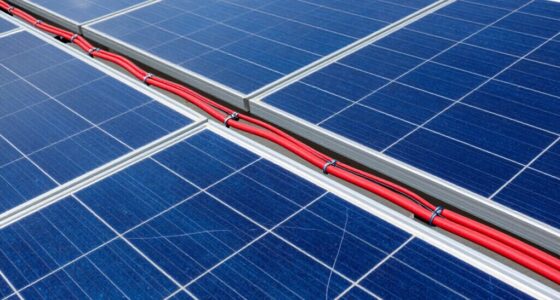
Replacing high-voltage cables is a critical task that guarantees the safety and reliability of electrical systems. Before you begin, it’s crucial to understand the importance of thorough insulation testing and strict safety precautions. Proper insulation testing ensures that the new cables can withstand operating voltages without risking faults or failures. It involves checking the insulation resistance between conductors and from conductors to ground, confirming that the cables are properly insulated and free from defects. This step is vital because it helps you identify potential issues before installation, preventing costly outages or dangerous situations later. Additionally, implementing robust safety measures is essential to protect personnel and equipment throughout the process.
Thorough insulation testing ensures safe, reliable high-voltage cable installation and prevents costly faults or failures.
Safety precautions are your top priority throughout this process. Wear appropriate personal protective equipment, including insulated gloves, safety glasses, and flame-resistant clothing. Make sure the power supply is fully disconnected and locked out to prevent accidental energization during the replacement. Use proper tools rated for high-voltage work, and double-check that all equipment is in good condition. Establish a clear safety perimeter around the work area, and ensure that only authorized personnel are present. Communicate with your team to coordinate each step, minimizing the risk of mishaps.
When you’re ready to replace the cables, start by carefully disconnecting the old cables, noting their routing and connections. Before handling the new cables, perform insulation testing on each one to verify their integrity. This step confirms that the cables haven’t been damaged during storage or transit. When installing the new cables, follow the manufacturer’s specifications meticulously, ensuring proper connectors and secure terminations. Proper cable management—such as using cable trays or conduits—helps prevent mechanical damage and maintains system reliability.
Throughout the installation, continuously observe safety precautions. Keep a safe distance from energized parts, and utilize insulated tools whenever possible. Once the cables are in place, perform additional insulation testing to verify that the installation is sound and that there are no faults. Only after passing these tests should you proceed to energize the system, but do so cautiously, monitoring for any irregularities. Remember, even after the cables are live, ongoing safety measures remain crucial.
Top picks for "step replac high"
Open Amazon search results for this keyword.
As an affiliate, we earn on qualifying purchases.
Frequently Asked Questions
What Are the Signs Indicating a High-Voltage Cable Needs Replacement?
You can tell a high-voltage cable needs replacement if you notice insulation degradation or physical damage like cuts, cracks, or burns. Signs such as frequent electrical faults, unexpected outages, or overheating also indicate the cable might be compromised. Don’t ignore these issues, as they pose safety risks and can cause equipment failure. Regular inspections are vital to catch these signs early and guarantee safe, reliable operation.
How Long Does a Typical High-Voltage Cable Replacement Process Take?
Think of replacing a high-voltage cable as rewiring the heartbeat of your system. It typically takes a few hours to complete, depending on the complexity of cable installation and safety protocols. You’ll need to carefully disconnect, replace, and reconnect components while guaranteeing safety measures are strictly followed. Rushing could compromise safety, so allocate enough time for each step. Patience and precision ensure the process flows smoothly and safely.
Are There Alternative Methods to Replace High-Voltage Cables Safely?
Yes, you can use alternative methods like remote handling and cable splicing to substitute high-voltage cables safely. Remote handling allows you to work from a safe distance, minimizing risk, while cable splicing enables you to connect new sections without full removal. These techniques reduce exposure to high voltage and improve safety, especially in hard-to-reach or hazardous environments. Always ensure proper training and safety protocols when applying these methods.
What Are the Environmental Considerations During Cable Disposal?
Think of cable disposal like tending a garden—you need careful planning. You should follow recycling protocols to guarantee materials are reused properly, reducing waste. Hazardous waste management becomes vital when dealing with insulation or metals containing harmful substances. Properly segregate and dispose of cables to prevent environmental contamination. By handling high-voltage cable disposal responsibly, you protect ecosystems and comply with regulations, turning a potential hazard into an opportunity for sustainable practices.
How Often Should High-Voltage Cables Be Inspected for Potential Issues?
You should schedule inspections for high-voltage cables regularly, typically every 3 to 5 years, depending on environmental conditions. During each inspection, focus on corrosion detection and overall cable integrity. If you notice signs of corrosion or damage, increase inspection frequency. Consistent inspections help catch potential issues early, preventing failures and ensuring safety. Remember, proactive maintenance is key to maintaining reliable and safe high-voltage cable systems.
Conclusion
Think of replacing high-voltage cables like tending to a delicate garden. With careful planning, proper tools, and safety precautions, you nurture the flow of energy just as you nurture healthy plants. When you follow each step diligently, you guarantee the garden remains vibrant and safe, avoiding storms or withering. Remember, your attention and care keep the power flowing smoothly—like a well-tended garden, your work sustains the entire system with safety and precision.